


Table of contents
- Step 1: Install Anaconda for building an Environment
- Step 2: Installing GPU Drivers
- Step 3: Install CUDA
- Step 4: Downloading cuDNN and Setup the Path variables
- Step 5: Download Visual Studio Community 2019 (Optional)
- Step 6: Setting Up the Environment for your project
- Step 7: Verify TensorFlow is using GPU
I have searched various methods, but I was not able to find the correct way to enable GPU on my Windows machine. But on research and reading much Documentation, I found a way to enable GPU on my Windows. After spending so much time and effort, I want to provide a simple and effective way to enable the device with GPU. We can approach either by installing TensorFlow or pytorch. But in this blog, we will be focussing on installation through TensorFlow.

TensorFlow is the most popular free open-source software library for machine learning and artificial intelligence. Using TensorFlow is recommended for training machine models. It uses keras, tensorboard, numpy, tensorflowonspark, cudnn, bazel, etc., as the dependencies.
You can also use Google Colab and Kaggle to write and execute Python in your browser. Google Colab and Kaggle are free of charge, but there is very limited access to GPUs and TPUs (basically used for neural network loads). So using your own GPU becomes essential.
Step 1: Install Anaconda for building an Environment

We need to install Anaconda for building an environment. Anaconda is a distribution of the Python and R programming languages for scientific computing that aims to simplify package management and deployment. The distribution includes data-science packages suitable for Windows, Linux, and macOS.
You can also use a Miniconda instead of an anaconda, but it is recommended to use Anaconda. Miniconda requires less space and is the more compact version of Anaconda, but it won’t affect your environment setup.
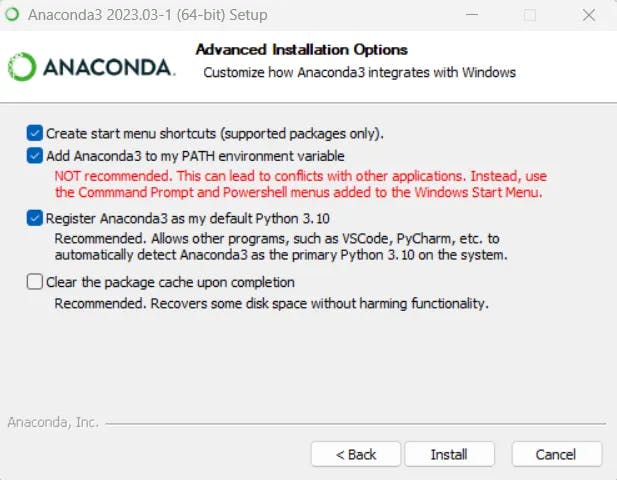
You can install Anaconda from their official site https://www.anaconda.com/download. After downloading the file, install the Anaconda from the installer file. During installation, please check box the boxes as shown below in the picture and then click on Install.
Step 2: Installing GPU Drivers

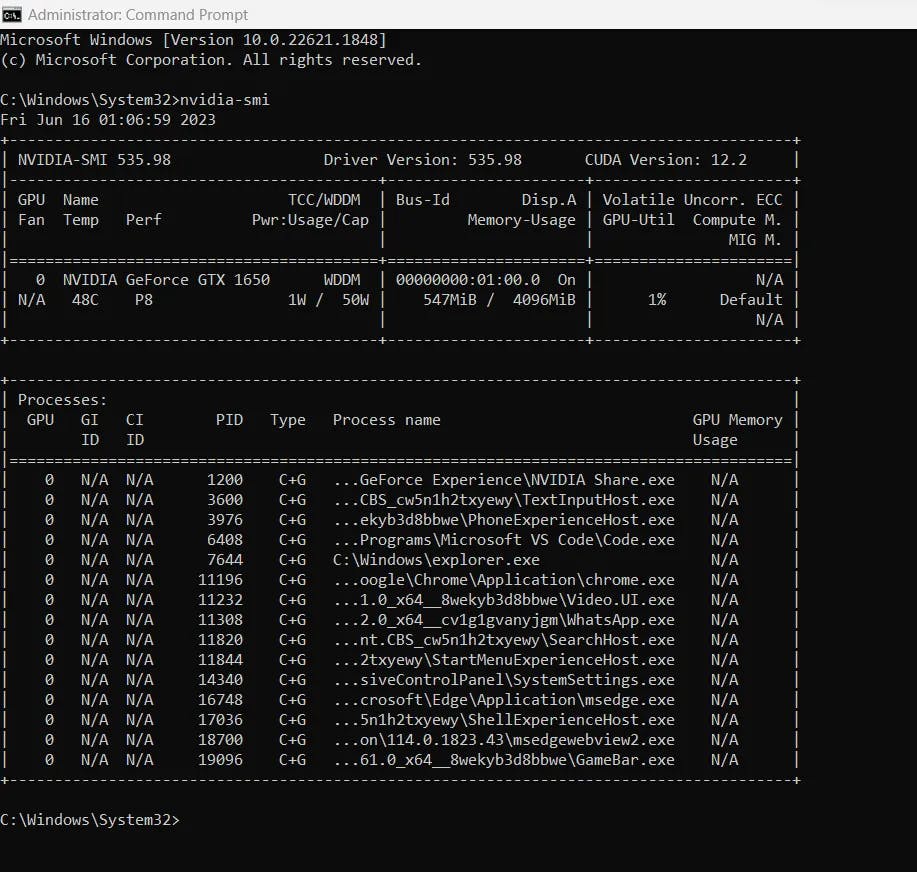
If you want to use Tensorflow on your GPU, you need to check whether your GPU is Cuda enabled or not. You can view your GPU compatibility with Cuda at https://developer.nvidia.com/cuda-gpus. You can also view your compatibility by running the command prompt as administrator by typing “nvidia-smi”. If it shows the output below, then your GPU is Cuda enabled.
nvidia-smi
If your GPU is Cuda enabled, you can download the driver for your GPU at https://www.nvidia.com/download/index.aspx. Choose the specification per your system requirement, or you can check your specs by NVIDIA Control Panel > System Information from the Windows search panel.

After downloading, install the driver and choose the recommended settings or default setting while installing the driver.
Step 3: Install CUDA

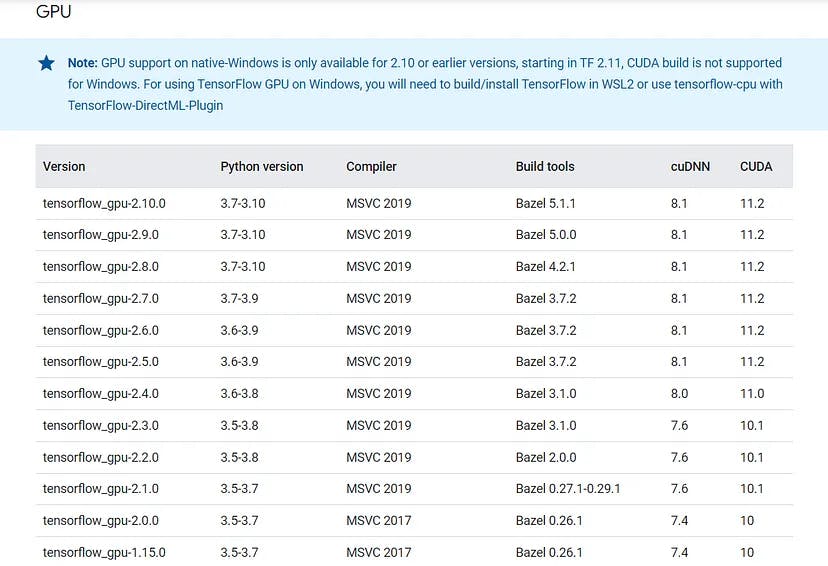
Install CUDA libraries that are compatible with Tensorflow. You can check compatibility at https://www.tensorflow.org/install/source_windows. Right now, dated 16 June 2023, only TensorFlow 2.10 is compatible with CUDA version 11.2, so we will download this particular CUDA Toolkit from https://developer.nvidia.com/cuda-11.2.2-download-archive?target_os=Windows&target_arch=x86_64&target_version=10&target_type=exelocal.
Download Installer for Windows 10 x86_64 from the above link. After downloading install the application from the .exe file. You can verify the installation of CUDA by running the command prompt (as administrator):
nvcc --version

Step 4: Downloading cuDNN and Setup the Path variables
After installing the CUDA Toolkit, 11.2 sets up cuDNN (CUDA Deep Neural Network library) files. Before downloading the cuDNN files you have to sign up for the NVIDIA Developer Program website: https://developer.nvidia.com/. Sign in or create a new account if you don’t have one already. After that, we can download cuDNN files from https://developer.nvidia.com/rdp/cudnn-archive.
Download the appropriate version which is compatible with the CUDA. In this case, we will download Download cuDNN v8.1.1 (February 26th, 2021), for CUDA 11.0,11.1, and 11.2 as mentioned above. After downloading extract the files and copy them to the new folder named “cuDNN”. Then move this folder to the C:\Program Files path.
Then comes the most important part of the installation of cuDNN setting the path variable:
- To set up the path variable, you need to Right click on the Start button > Click on System > Click on Advanced System Settings > Click on Environment Variables > Under System Variables Double click on PATH.
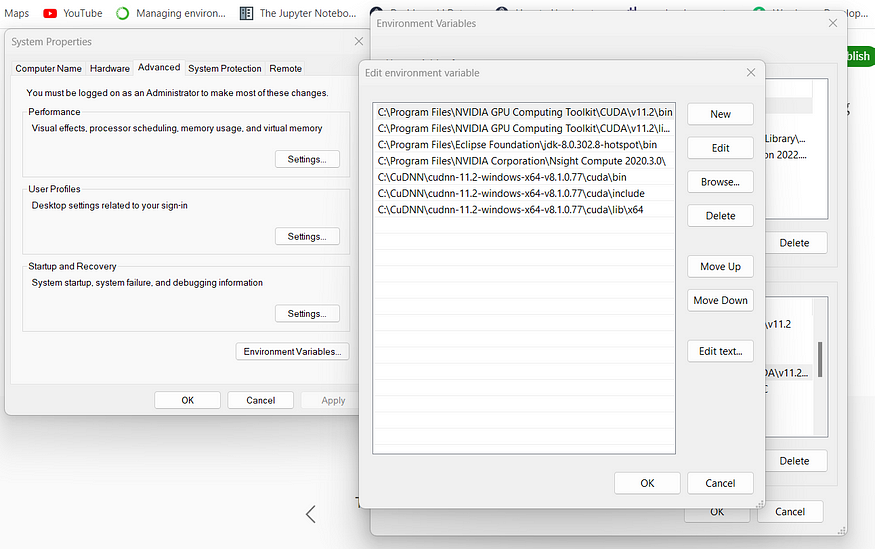
Setting Path Environment Variables
Copy the Path “C:\Program Files\CuDNN\cudnn-11.2-windows-x64-v8.1.0.77\cuda\bin”
Copy the Path “C:\Program Files\CuDNN\cudnn-11.2-windows-x64-v8.1.0.77\cuda\include”
Copy the Path “C:\Program Files\CuDNN\cudnn-11.2-windows-x64-v8.1.0.77\cuda\lib\x64”
Then click on Ok and come out of the environment variable section.
Step 5: Download Visual Studio Community 2019 (Optional)
If some problem occurs while setting up the GPU, perform this step. Download the Visual Studio Community 2019 from https://my.visualstudio.com/Downloads?q=visual%20studio%202019&wt.mc_id=o~msft~vscom~older-downloads.
After downloading, open the Visual Studio Installer and Select Redistributables and Build Tools, as shown in the below picture.

Step 6: Setting Up the Environment for your project
For setting up an environment, we have to open anaconda prompt. Follow the following steps for making an environment:
conda create -- name GPU python=3.10
conda activate GPU
conda install jupyter notebook
pip install tensorflow==2.10.0
pip install tensorflow-hub
jupyter notebook
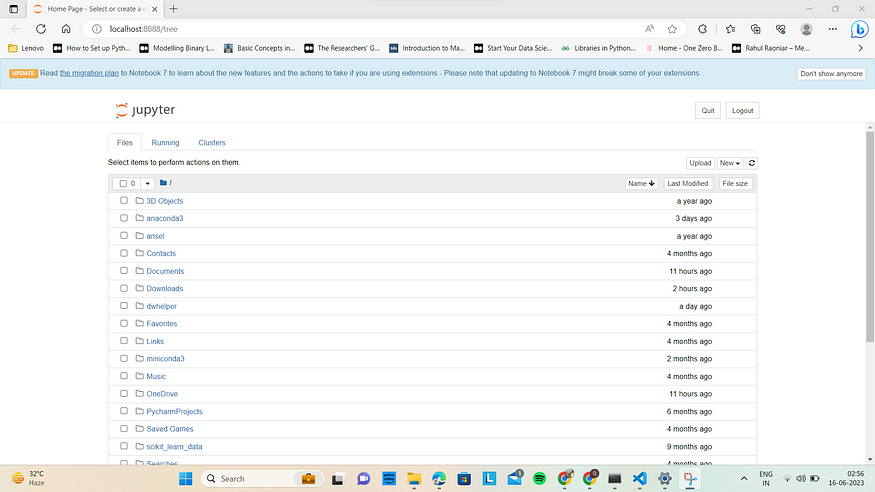
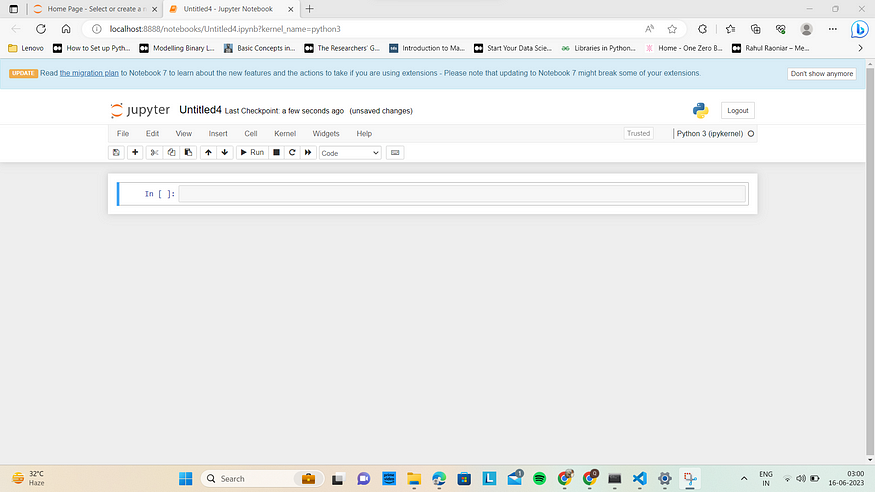
- Click on New > A drop-down menu will open from which Select Python 3 (ipykernel) under notebook section > Jupyter notebook will be open.
Step 7: Verify TensorFlow is using GPU
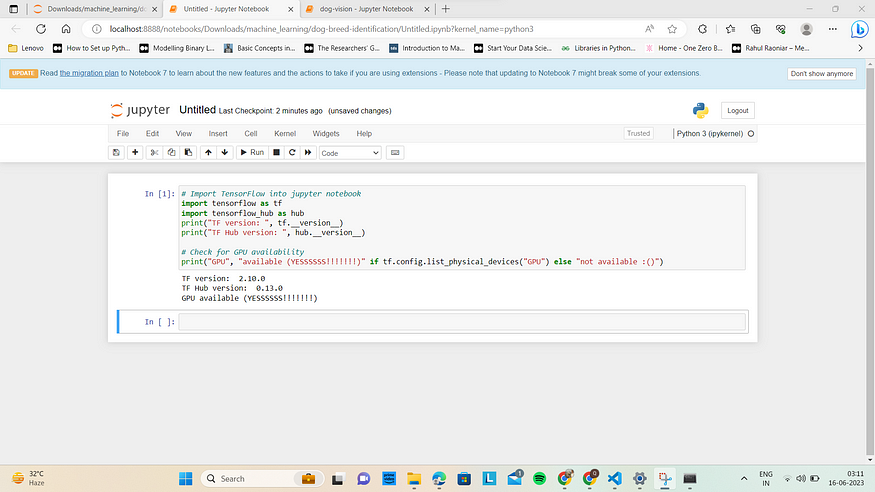
In the jupyter notebook, run the following Python commands. It will show whether you are using your GPU or not:
# Import TensorFlow into jupyter notebook
import tensorflow as tf
import tensorflow_hub as hub
print("TF version: ", tf.__version__)
print("TF Hub version: ", hub.__version__)

# Check for GPU availability
print("GPU", "available (YESSSSSS!!!!!!!)" if tf.config.list_physical_devices("GPU") else "not available :()")
See how easy it is to make your PC or laptop CUDA-enabled for Deep Learning. You can easily follow all these steps, which will make your Windows GPU enabled. Currently, we are using the latest GPU-supported Windows TensorFlow modules. This blog will resolve all your queries about installing TensorFlow modules using GPU.